WP-PostViewsプラグインで人気記事を画像付きで表示する
ブログを運営していると、表示させたいのが記事の人気ランキングですね。
WordPressですから、もちろん人気記事を表示させるプラグインはあります。もっともポピュラーなプラグインは「WordPress Popular Post」ですが、カスタマイズが難しいようですね。
しかし、記事の表示数をカスタムフィールドに格納してくれるプラグイン「WP-PostViews」なら、表示回数のデータの利用が簡単なので、本プラグインを利用し人気記事を画像付きで表示することにします。
WP-PostViewsプラグインのインストール
管理画面の「プラグイン」ー「新規追加」から、検索インストールします。
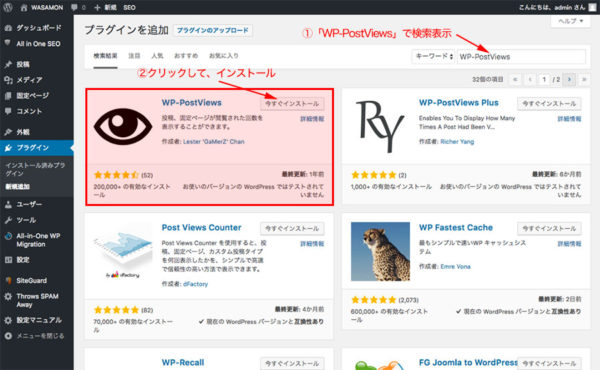
インストールが済んだら、そのまま「有効化」してください。
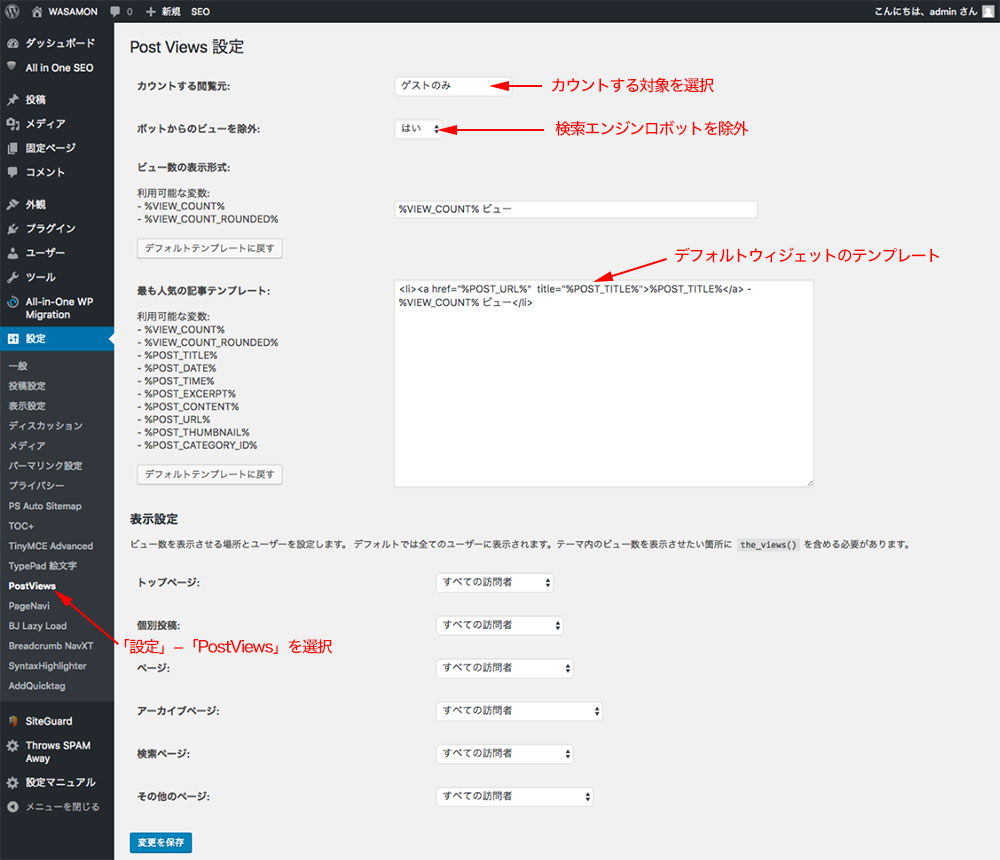
WP-PostViewsプラグインの設定
有効化したら管理画面の「設定」ー「PostViews」を選択して、基本設定をします。
プラグインで提供されるウィジェットを使ってみる
管理画面の「ウィジェット」で、WP-PostViewsで記事観覧回数の統計を取得して、人気記事や最新記事を表示する「表示数」というウィジェットが追加されています。このウィジェットを利用して、サイドバーに「人気記事」を表示させてみました。
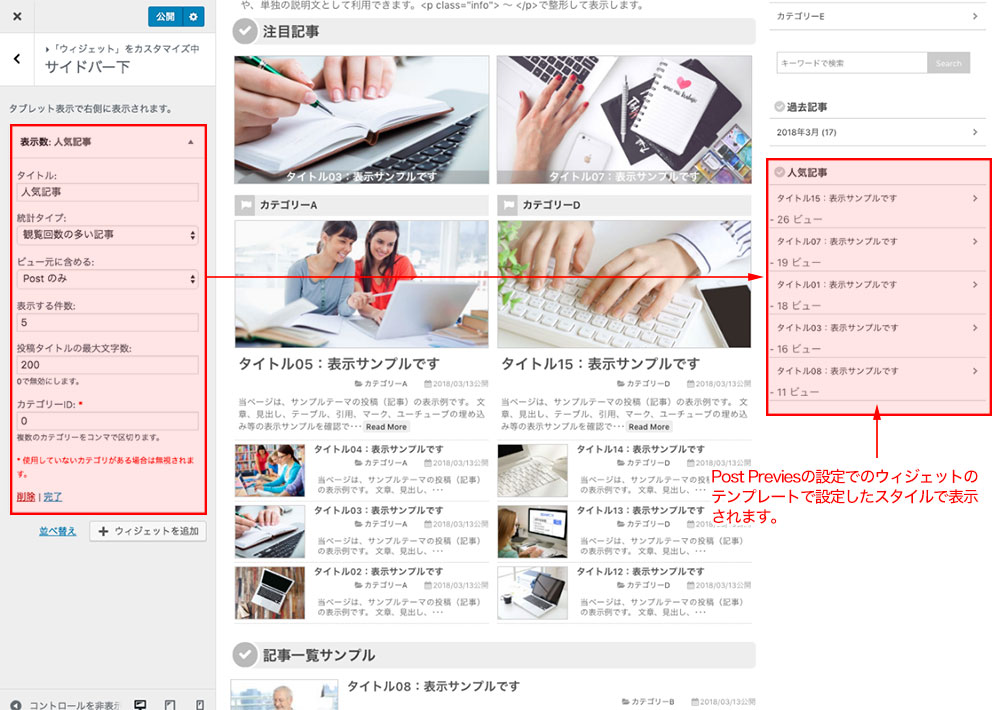
テンプレートで用意されている変数を利用すると、サムネイル付きの表示にすることも可能です。
カスタムフィールドに保存されています表示数データを利用する
プラグインの設定で、テンプレートをカスタマイズしてサムネイル付きの人気記事を表示させることもできるのですが、結構ややこしい気がします。
また、体裁は別途CSSを用意する必要があります。
それなら、「WP-PostViews」プラグインが保存しているデータを利用して、ウィジェットを作って表示させるほうが自由度が高いので挑戦してみましょう。
「WP-PostViews」プラグインは、ビューデータをカスタムフィールドの「「views」に保存していますので、このデータを利用して人気記事を表示数順に並べて表示させます。
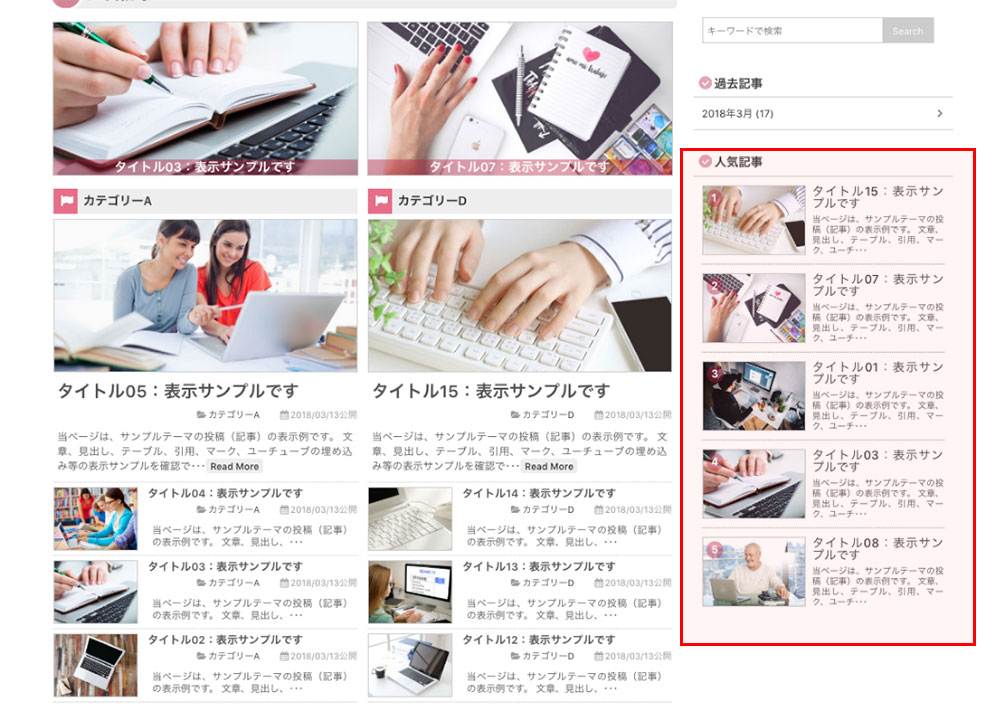
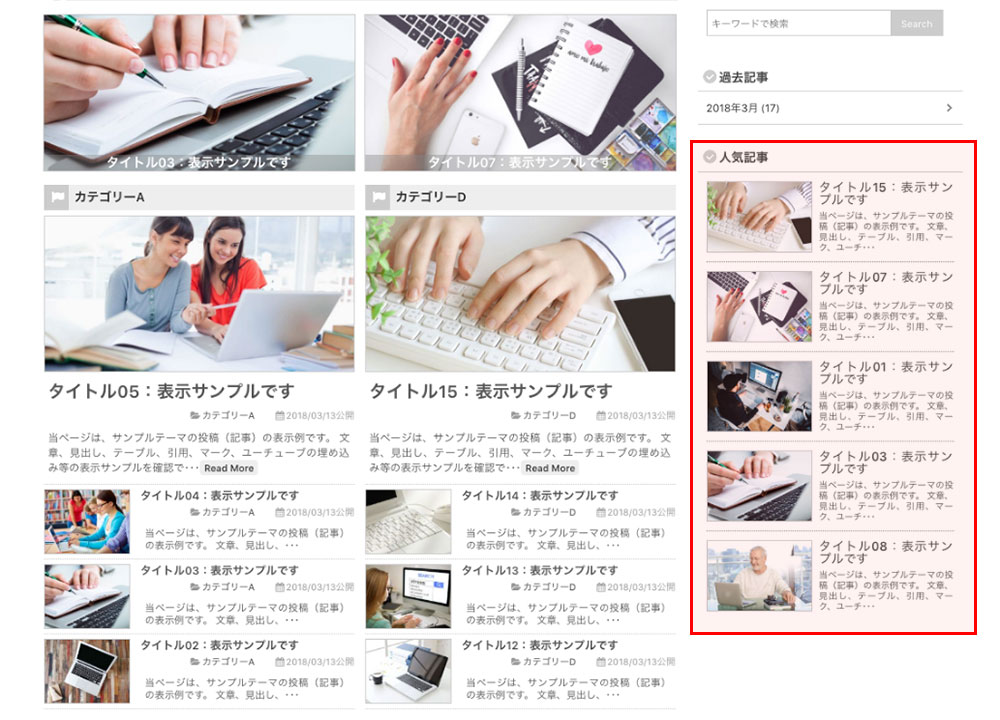
サイドバーに人気記事をサムネイル付きで表示させる例
テーマによってクラスの指定が異なると思いますが、カスタムフィールド「views」の値の大きい方から5記事表示させています。
<div class="sidebar-wrapper">
<h4>人気記事</h4>
<div class="rank-post">
<?php $arg = array('meta_key' =>'views','orderby' => 'meta_value_num', 'order' => 'DESC','posts_per_page' => 5 );
		$the_query = new WP_Query( $arg );
		if ( $the_query->have_posts() ) :
		while ( $the_query->have_posts() ) : $the_query->the_post(); ?>
<div class="p-post">
  <?php if ( has_post_thumbnail() ) : ?>
    <div class="img-set">
      <a href="'.get_permalink().'" class="link">	<?php the_post_thumbnail(); ?></a>
    </div>
  <?php endif; ?>
  <h5><a href="'.get_permalink().'"><?php the_title(); ?></a></h5>
  <p><?php echo wp_html_excerpt(get_the_excerpt(), 50, '・・・'); ?></p>
  <div class="clr"></div>
</div>
<?php endwhile; endif; ?>
</div>
</div>
上記のCSS指定例です。
.rank-post {margin-top: 10px; padding: 0 10px ; overflow: hidden;}
.rank-post .p-post {margin-bottom: 10px; padding-bottom: 10px; border-bottom: 1px dotted #999;}
.rank-post  h5{display: block; padding: 0 0 5px ; font-size: 1em; line-height: 1.0em; font-weight: 500; text-align: left;}
.rank-post .p-post:last-child {margin-bottom: 0; border-bottom: none;}
.rank-post .p-post a {color: #444; text-decoration: none;}
.rank-post .p-post a:hover {text-decoration: underline;}
.rank-post .p-post p {font-size: 0.7em; line-height: 1.2em; color: 666; text-align: justify; text-justify: inter-ideograph;}
.rank-post .p-post .img-set{float: left; margin-right: 8px; max-width: 120px; border: 1px solid #CCC;display: block; overflow: hidden;}
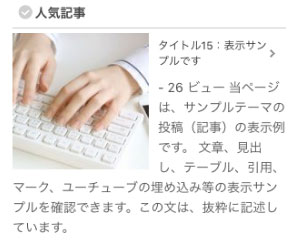
上記設定の表示は、次の用になります。
ウィジェットにして利用する
折角ですから、ウィジェットにしてテーマに組み込むことにしましょう。
ウィジェット化するに当たり、記事に番号を追加してみました。まだ、不備な点がありますが、変更して利用してみて下さい。
/* 人気の記事 */
class WP_Widget_View extends WP_Widget {
	function __construct() {
		$widget_ops = array('classname' => 'Widget_View', 'description' => 'サイドバーにページビュー順に表示できます。表示にはWP-PostViewsプラグインが必要です。(3カラムフッターでも可)');
		parent::__construct('View', 'サイドバー用:人気記事', $widget_ops);
	}
	function widget( $args, $instance ) {
	extract($args);
		$number = $instance['number'];
        $title = apply_filters('widget_title', empty($instance['title']) ? ' ' : $instance['title'], $instance, $this->id_base);
	    echo $before_widget;
	    if ($title){echo $before_title . $title . $after_title;}
	    echo '<div class="rank-post">';
	    $cnt = 1;
	    $arg = array('meta_key' =>'views','orderby' => 'meta_value_num', 'order' => 'DESC','posts_per_page' => $number );
		$the_query = new WP_Query( $arg );
		if ( $the_query->have_posts() ) :
		while ( $the_query->have_posts() ) : $the_query->the_post();
        if( get_post_meta(get_the_id(), 'views', true)){
        echo '<div class="p-post">';
        if ( has_post_thumbnail() ) {
        	echo '<div class="img-set">';
			echo '<a href="'.get_permalink().'" class="link">';
			the_post_thumbnail();
			echo '<div class="num2">'. $cnt .'</div>';
			echo '</a></div>';
		}
		echo '<h5><a href="'.get_permalink().'">'.the_title('', '', false).'</a></h5>';
		echo '<p>' . wp_html_excerpt(get_the_excerpt(), 50, '・・・'). '</p>';
		echo '<div class="clr"></div>';
		echo '</div>';
		$cnt++;
		}
		endwhile;
        endif;
	    echo '</div>';
	echo $after_widget;
	wp_reset_postdata();
	}
    function update( $new_instance, $old_instance ) {
        $instance['title'] = strip_tags($new_instance['title']);
		$instance['number'] = (int) $new_instance['number'];
		// エラーチェック
		if (!$instance['title']) {
			// タイトルが空白の場合、元の値に戻してエラー表示
			$instance['title'] = strip_tags($old_instance['title']);
			$this->m_error = '<span style="color:#ff0000;">タイトルが空白です。元の値に戻します。</span>';
		}
		return $instance;
	}
    function form( $instance ) {
        $instance = wp_parse_args( (array) $instance, array( 'title' => '') );
		$title = strip_tags($instance['title']);	// タイトル
		$number = $instance['number'];				// 表示する投稿数
		// フォームの出力
		echo '<p><label for="'. $this->get_field_id('title') .'">タイトル:</label><br />';
		echo '<input type="text" name="'. $this->get_field_name('title') .'" id="'. $this->get_field_id('title') .'" value="'.$title.'" style="width:100%;" /></p>';
		echo '<p><label for="'. $this->get_field_id('number') .'">並べて表示する投稿数:</label>';
		echo '<input type="text" name="'. $this->get_field_name('number') .'" id="'. $this->get_field_id('number') .'" value="'.$number.'" style="width:60px;" /></p>';
    }
}
add_action('widgets_init',create_function('', 'return register_widget("WP_Widget_View");'));
追加したCSSになります。
.rank-post {margin-top: 10px; padding: 0 10px ; overflow: hidden;}
.rank-post .p-post {position: relative; margin-bottom: 10px; padding-bottom: 10px; border-bottom: 1px dotted #999;}
.rank-post  h5{display: block; padding: 0 0 5px ; font-size: 1em; line-height: 1.0em; font-weight: 500; text-align: left; text-align: justify; text-justify: inter-ideograph;}
.rank-post .p-post:last-child {margin-bottom: 0; border-bottom: none;}
.rank-post .p-post a {color: #444; text-decoration: none;}
.rank-post .p-post a:hover {text-decoration: underline;}
.rank-post .p-post p {font-size: 0.7em!important; line-height: 1.2em!important; color: 666; text-align: justify!important; text-justify: inter-ideograph!important;}
.rank-post .p-post .img-set{float: left; margin-right: 8px; max-width: 120px; border: 1px solid #CCC;display: block; overflow: hidden;}
.rank-post .p-post .num2 {position: absolute; top: 5px; left: 5px; font-size: 12px; line-height: 12px; font-weight: bold; color: #FFF; padding: 4px 6px; background-color: #369;  -webkit-border-radius: 10px; -moz-border-radius: 10px; border-radius: 10px;}
.rank-post .eday {float: right; color: #999; font-size: 9px;}
上記は、サンプルサイトに設定した例です。色指定は異なりますが、下図の様に表示されます。